

Slack Help Desk — AI Query Resolution with Smart Escalation
Answer employee questions from your documentation with a Deep Agent and semantic search — and escalate to a developer meeting (Slack + Gmail + Google Meet) only when the docs fall short.
Turn a Slack channel into an AI help desk. A Deep Agent runs semantic search across your Knowledge Base to answer employee questions from your docs — and when the docs fall short, it escalates by emailing a developer, opening a Google Meet, and replying in the thread with the link.
What you'll build
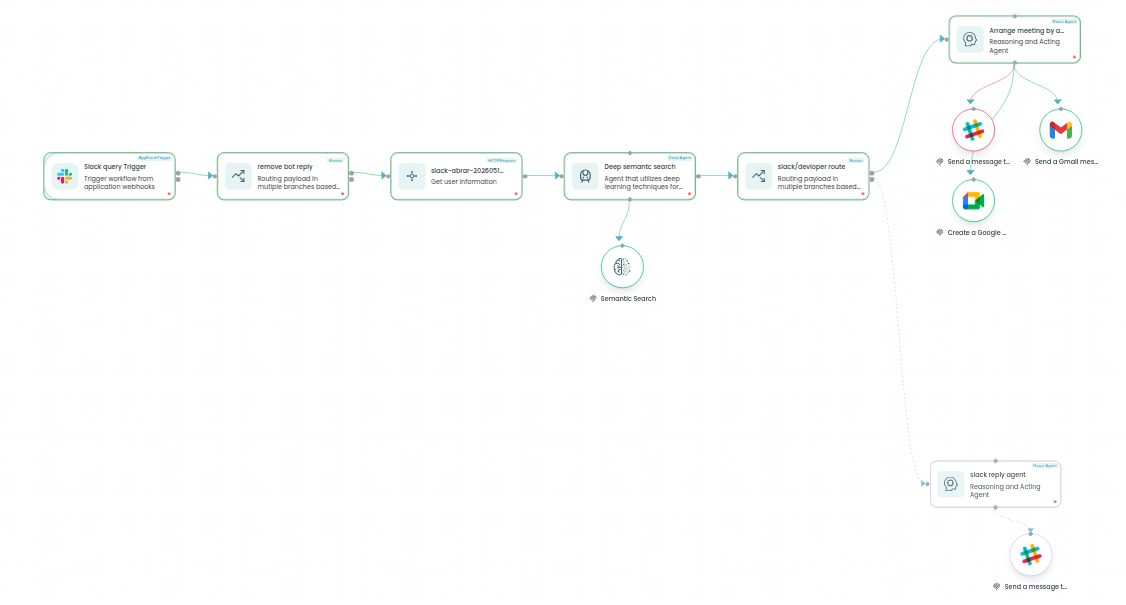
A Slack-triggered workflow that filters out its own bot replies, looks up the sender, searches your docs, and then branches: reply from the docs or escalate to a human.
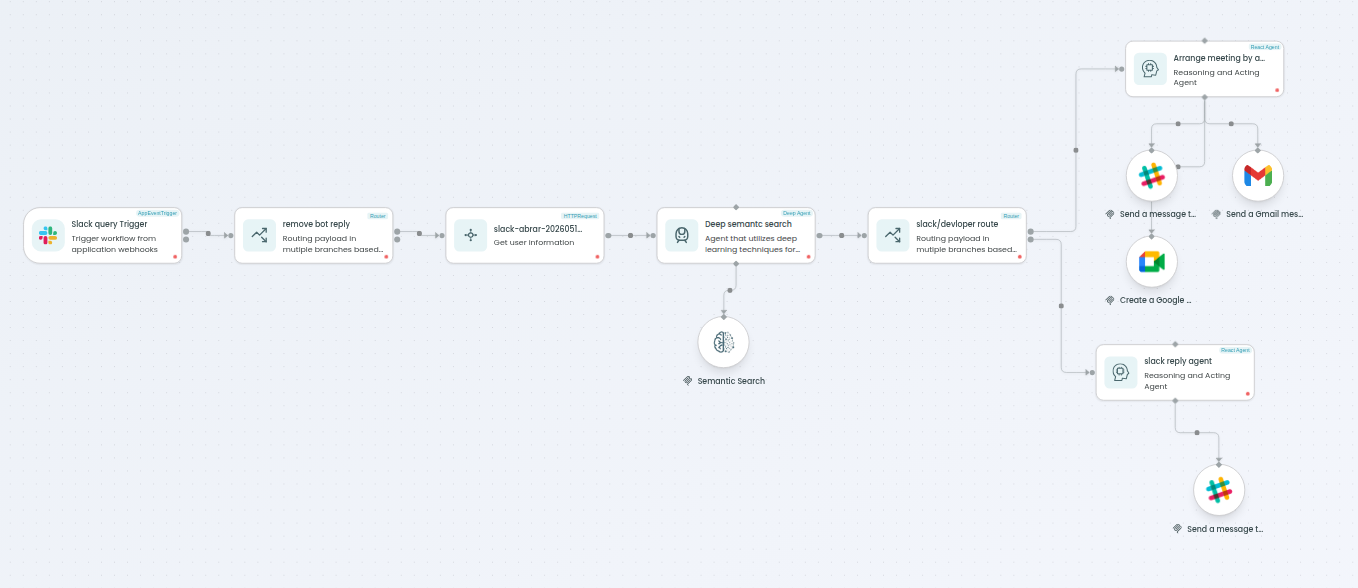
Architecture at a glance
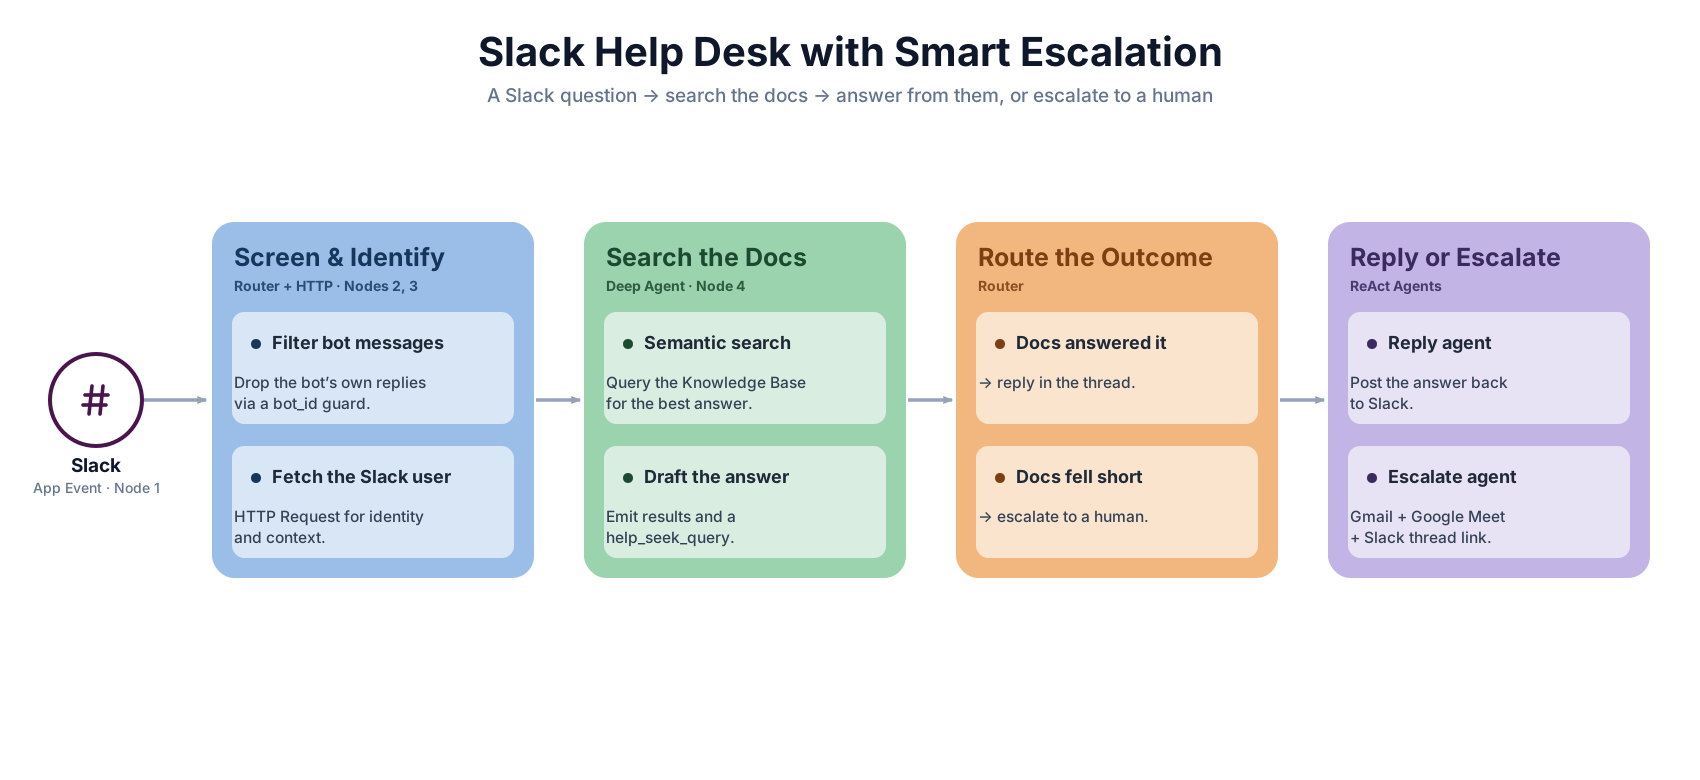
What you'll learn
- Subscribe to Slack events with an App Event Trigger (credential auth + API key).
- Use a Router to filter out the bot's own messages via a
bot_idguard. - Fetch the Slack user's details with an HTTP Request.
- Configure a Deep Agent with a Knowledge Base semantic-search tool — input
text_query, outputsresultsandhelp_seek_query. - Branch on
help_seek_queryto reply from the docs or escalate to a human. - Orchestrate two React Agents: a Slack reply agent and a developer-meeting agent (Gmail + Google Meet + Slack).
Before you begin
- A FlowGenX account with access to Design → Flow Designer → Workflow Canvas.
- A Slack app with event subscriptions enabled, plus its credentials and an API key.
- An LLM provider API key (OpenAI, Anthropic, Gemini).
- A Knowledge Base populated with your documentation, connected via the KB connector.
- Gmail and Google Meet connectors authorized (for the escalation path).
Step 1 — Add the Slack App Event Trigger
Goal: set up the entry point that subscribes to Slack events and fires on every message. (~3 min)
- Drag the App Event Trigger node onto the canvas and open its config panel.
- Under Credentials / Auth, configure your Slack app credentials and add the API key to authenticate the subscription.
- Select the Slack event(s) to subscribe to (e.g. message events for the target channel).
- Click Apply / Subscribe to register the event subscription.
- Switch to Listen / test mode and post a message in Slack — confirm a real-time event arrives on the canvas.
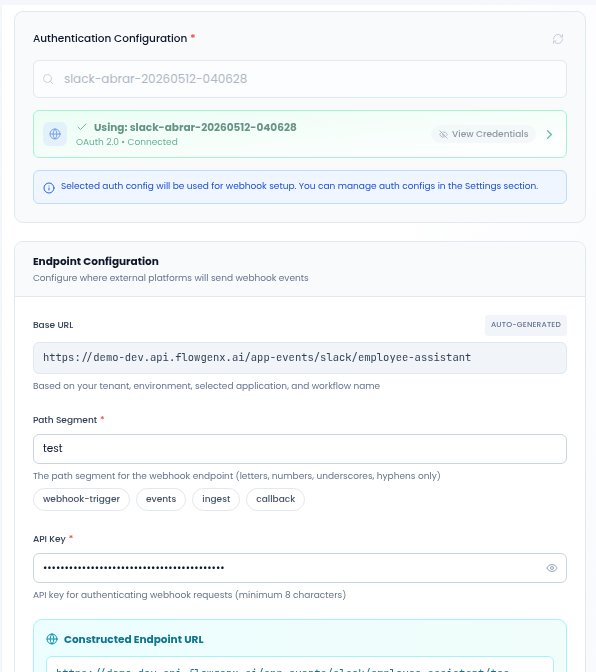
Tip — listen at design time. Keep Listen running and post a test message; the live event payload arrives so you can map its fields in the downstream nodes.
⚠ Fires on every message — including the bot's own replies. You'll filter those out in Step 2.
✅ Verify: posting a message in Slack shows a live incoming event with the message payload.
Step 2 — Add a Router to remove bot replies
Goal: filter out the workflow's own bot messages so only real user queries continue. (~2 min)
- Drag a Router after the App Event Trigger and connect the edges.
- Click the Router to define routes.
- With Expression-Based routing, check whether the event contains a bot ID — a human message has no
bot_id. - Write the forward condition for route
a(e.g.bot_id == null— the exact field depends on your Slack payload). This is the path real user queries take. - Leave bot messages (where
bot_idis present) to fall through to the fallback route, where they're dropped. Click Apply.
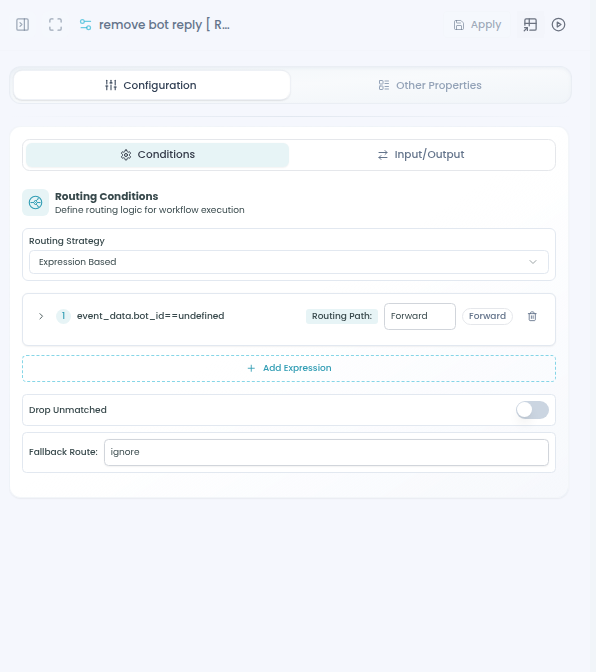
Tip — prevents an infinite loop. Because the trigger fires on all messages, this guard stops the bot from reacting to its own replies and looping forever.
✅ Verify: a message you send as a user continues down route a; a bot reply is routed to the fallback and stops.
Step 3 — Fetch the sender's user info
Goal: look up the Slack user who sent the message so the response can be personalized. (~2 min)
- Drag an HTTP Request after the Router's forward path and connect the edges.
- Configure it to call Slack's user-lookup endpoint (e.g.
users.info), passing the user ID from the event payload. - Add authentication (your Slack token / API key) in the headers.
- Map the user ID from the trigger event via a JEXL expression or the Context Explorer, then click Apply.
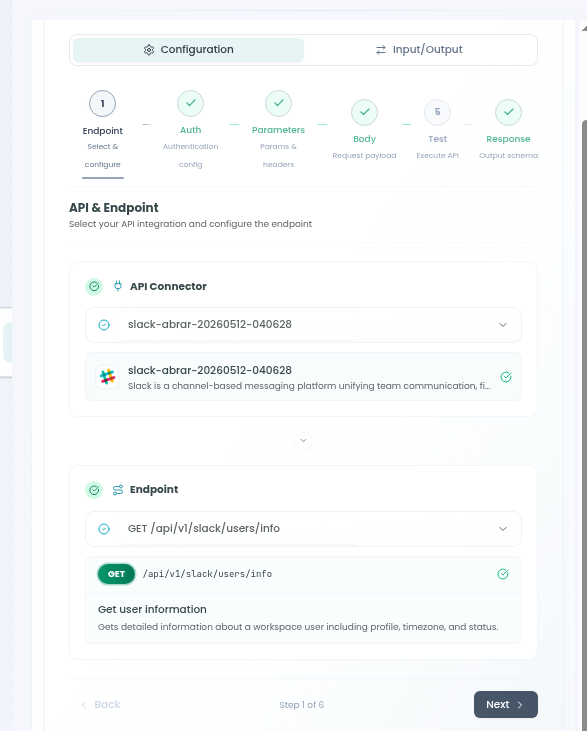
✅ Verify: a test run returns the user's profile (name, email, …) in the node output.
Step 4 — Configure the Deep Agent (semantic search)
Goal: search your Knowledge Base and decide whether the docs answer the query or a human is needed. (~5 min)
-
Drag a Deep Agent after the HTTP Request and connect the edges.
-
Under Models → LLM Model, choose or create a model.
-
Under Tools, attach the Knowledge Base connector's Semantic Search tool.
-
Under Prompts, paste a system prompt:
You are an internal help-desk assistant. Use the semantic search tool to find documentation relevant to the user's query. Judge whether the retrieved results contain enough information to fully answer it. If yes, set
help_seek_query = falseand return the answer inresults. If the docs don't contain enough information, sethelp_seek_query = true. -
Under Schema → Input, define
text_query(string) and map it to the user's message text from the trigger. -
Under Schema → Output, define
results(string/object) andhelp_seek_query(boolean), then click Apply.
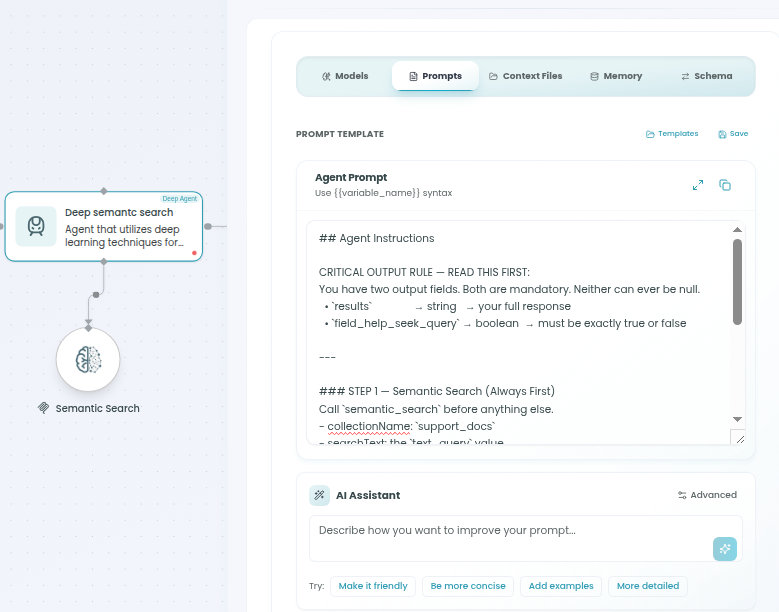
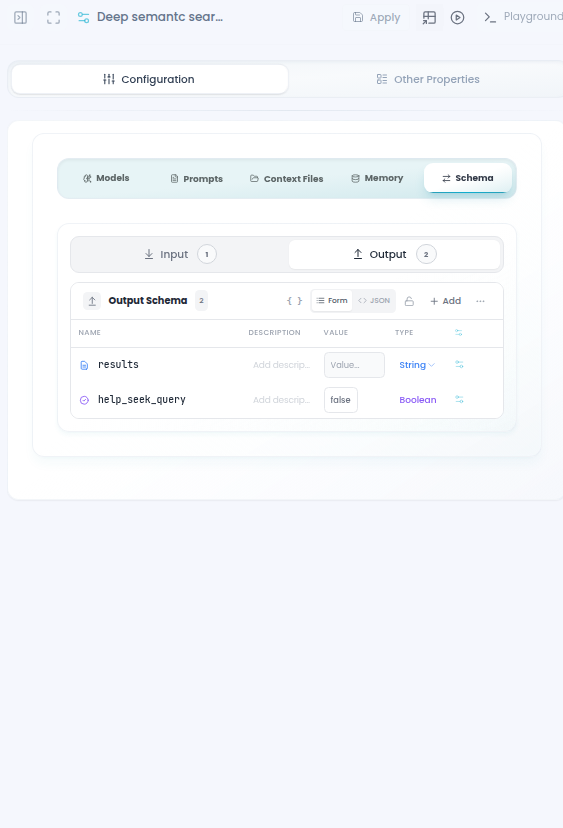
Tip — help_seek_query is the decision signal. true means "escalate to a developer"; false means "the docs are enough, just reply."
⚠ Knowledge Base must be connected. If the KB isn't connected or is empty, the agent can't ground its answer and may over-escalate every query.
✅ Verify: the output schema shows results and help_seek_query, and a test query returns a relevant answer from your docs.
Step 5 — Add a Router for the escalation decision
Goal: branch the workflow based on the Deep Agent's help_seek_query. (~2 min)
- Drag a Router after the Deep Agent and connect the edges.
- With Expression-Based routing, write
help_seek_query === trueon routea. - Connect route
ato the developer-meeting React Agent (Step 6). - Leave the fallback route (when
help_seek_queryis false) connected to the Slack reply React Agent (Step 7). Click Apply.
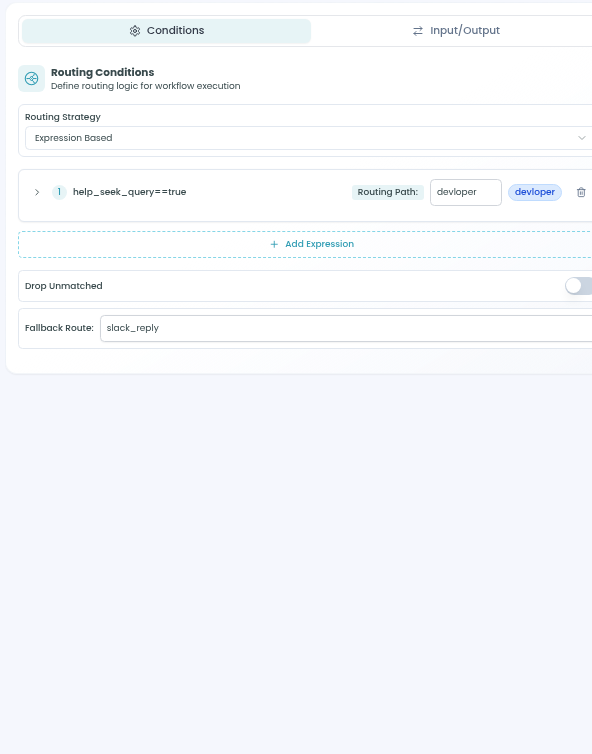
✅ Verify: the Router displays a developer path (true) and a slack-reply fallback path.
Step 6 — React Agent: Arrange a developer meeting
Goal: on the developer path — assign a developer, email them, create a Google Meet, and reply in the Slack thread with the link. (~5 min)
-
Drag a React Agent connected to the Router's route
a(developer path). -
Under Schema → Input, define
thread,channel_id, anduser_info, mapping them from the trigger and the HTTP Request outputs. -
Under Models, choose your LLM model.
-
Attach the tools the agent needs: Gmail (send message), Google Meet (create space), and Slack (send message).
-
Under Prompts, paste a system prompt:
You are an escalation assistant. Assign the developer team to the user's query. Email the assigned developer with the query and user details, create a Google Meet space, and reply in the original Slack thread with the meeting link so the user can join.
-
Click Apply.
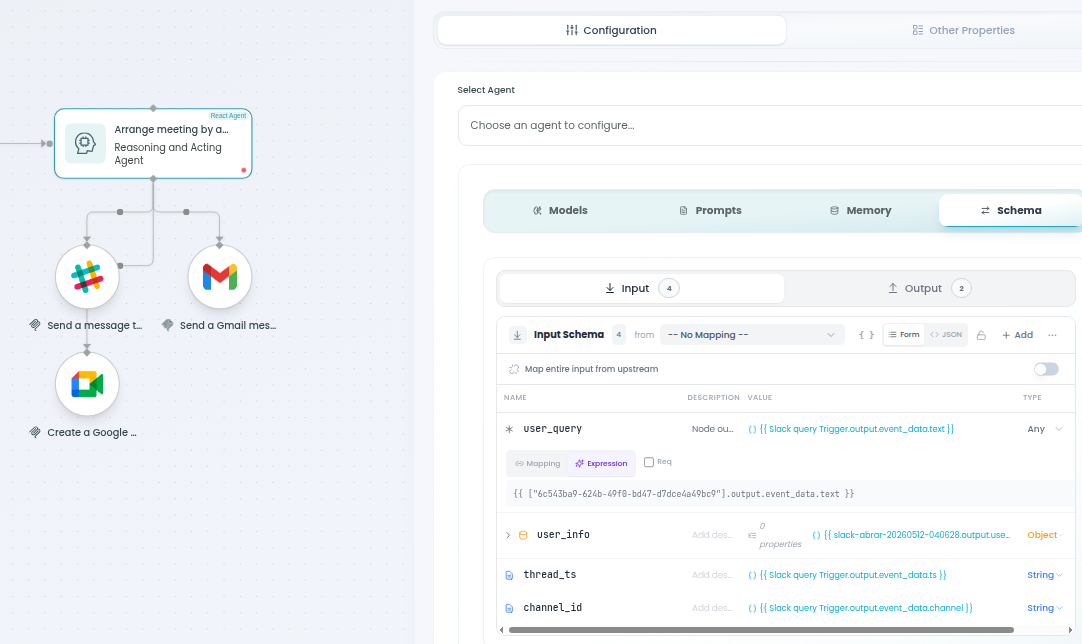
Tip — reply in context. Pass the original thread and channel_id so the reply lands in the same conversation, not a new message.
⚠ Authorize the connectors. Make sure Gmail and Google Meet are authorized, or the agent can't send the invite or create the meeting.
✅ Verify: a test escalation sends the email, creates a Meet link, and posts it back in the Slack thread.
Step 7 — React Agent: Slack reply
Goal: on the reply path — post the Deep Agent's answer directly back to the Slack thread. (~3 min)
-
Drag a second React Agent connected to the Router's fallback (slack-reply) path.
-
Under Schema → Input, take
resultsdirectly from the Deep Agent output, plus the samethreadandchannel_idused by the meeting agent. -
Attach the Slack (send message) tool.
-
Under Prompts, paste a system prompt:
You are a help-desk reply assistant. Post the provided answer as a reply in the original Slack thread, clearly and concisely.
-
Click Apply.
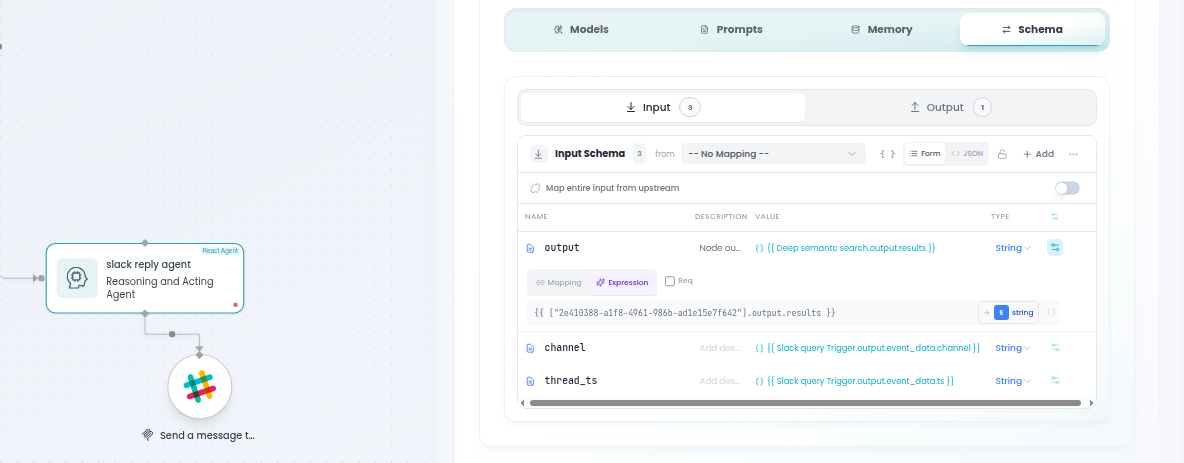
✅ Verify: a query the docs can answer gets a reply posted in the same Slack thread.
Step 8 — Save and publish
Goal: persist your work and promote it so the Slack trigger can fire it. (~2 min)
- Click Save (bottom-left) — saved as a draft.
- Click Publish (or Republish on later edits).
- Wait for the success toast: "Workflow published successfully."
⚠ Always re-publish after edits. Saved-but-unpublished changes won't run when the event fires.
Step 9 — Trigger and test from Slack
Goal: send a real Slack message and watch the agents reason and act. (~3 min)
- In your subscribed Slack channel, post a question a user might ask.
- Confirm the App Event Trigger fires and the Router lets the human message through route
a. - Watch the Deep Agent search the docs and set
help_seek_query. - Confirm you get either a direct thread reply (docs answered it) or a developer meeting invite + thread reply with a Google Meet link (escalation).
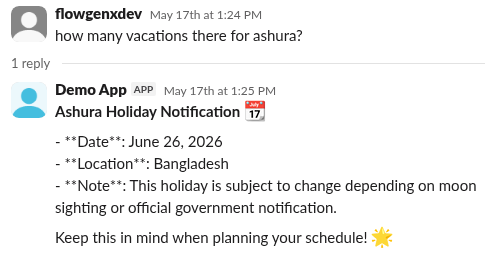
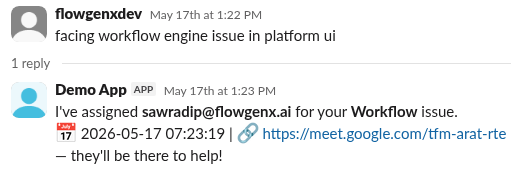
Tip — test both branches. Send one query covered by your docs and one that isn't, to verify both the reply and escalation paths.
Step 10 — Monitor the execution
Goal: review run history, trace the path, and inspect node-level inputs and outputs. (~2 min)
- Go to Monitor → Workflow Runs and select your Slack help-desk workflow.
- Click the run ID for the test you just executed.
- Review the trace —
node_name,node_type, and therouting_pathtaken by each Router. - Click any node (Deep Agent, React Agent) to inspect its captured input/output, including
resultsandhelp_seek_query.
✅ Verify: you can drill into the Deep Agent node to view the results and help_seek_query captured for the run.
You're done — what's next
You've built a Slack help desk that answers from your docs and escalates to a developer meeting when needed. Keep going:
- Introduction to Agents — React, Supervisor, and Swarm patterns.
- Omnichannel Support Ticket Triage — the same ideas across Zendesk + HubSpot.
- Traceability — full run observability.
Troubleshooting
| Symptom | Likely cause | Resolution |
|---|---|---|
| Agent node shows a red dot | Model not configured or invalid API key | Open the node → Models → verify the key and test the connection |
| Bot replies to itself in a loop | Bot-filter Router missing or wrong condition | Add / fix the bot_id guard on route a (Step 2) |
| Deep Agent over-escalates every query | Knowledge Base not connected or empty | Connect and populate the KB, then re-test |
| Escalation email / Meet not created | Gmail or Google Meet connector not authorized | Authorize both connectors and re-run |
| Reply lands in a new message, not the thread | thread / channel_id not mapped | Map both from the trigger into each React Agent |
| Trigger never fires | Slack subscription inactive or not published | Re-check the Slack subscription and click Republish |
Omnichannel Support Ticket Triage with AI Routing
Triage support tickets from Zendesk and HubSpot — classify intent and sentiment with a ReAct Agent, reply on the right CRM, and notify the owning developer in Google Chat.
CRM Enrichment and Lead Scoring
Enrich incoming lead data, score and tier it (Hot / Warm / Cold), then create a contact, deal, note, and task in HubSpot and notify the owner by email.