

Set Up Your Co-Worker
Name your co-worker, write its job description, equip its first skills, and enable it. A working teammate in about fifteen minutes.
This walkthrough takes an empty account to a co-worker that answers questions using your systems and your organization's knowledge. Nothing here requires a workflow or a line of code.
Before you begin
- A FlowGenX Chat account. Co-Worker Studio is one-to-one with the account, so no provisioning request is needed.
- At least one connected app for the systems you want it to reach, set up in Integration Studio. A co-worker with no connections can still reason, retrieve knowledge, and remember, but it cannot read your task board.
- Optional: documents loaded into the Knowledge Base if you want it to answer policy and process questions.
The co-worker acts under your account's connections. Whatever you have authorized, it can reach. Decide that scope before you enable it, not after.
Step 1 - Open Co-Worker Studio
Goal: provision the co-worker and land on the tab where it gets its name. (~1 min)
- In FlowGenX Chat, open Co-Worker Studio from the left rail.
- On a fresh account, a draft co-worker is created for you automatically and the studio opens on the Identity tab.
✅ Verify: the header shows the studio title and a Disabled state. Being disabled at this point is correct. It stays inert until you finish the setup.
Step 2 - Give it an identity
Goal: fill the four identity fields that decide who the co-worker is and what it takes on. (~5 min)
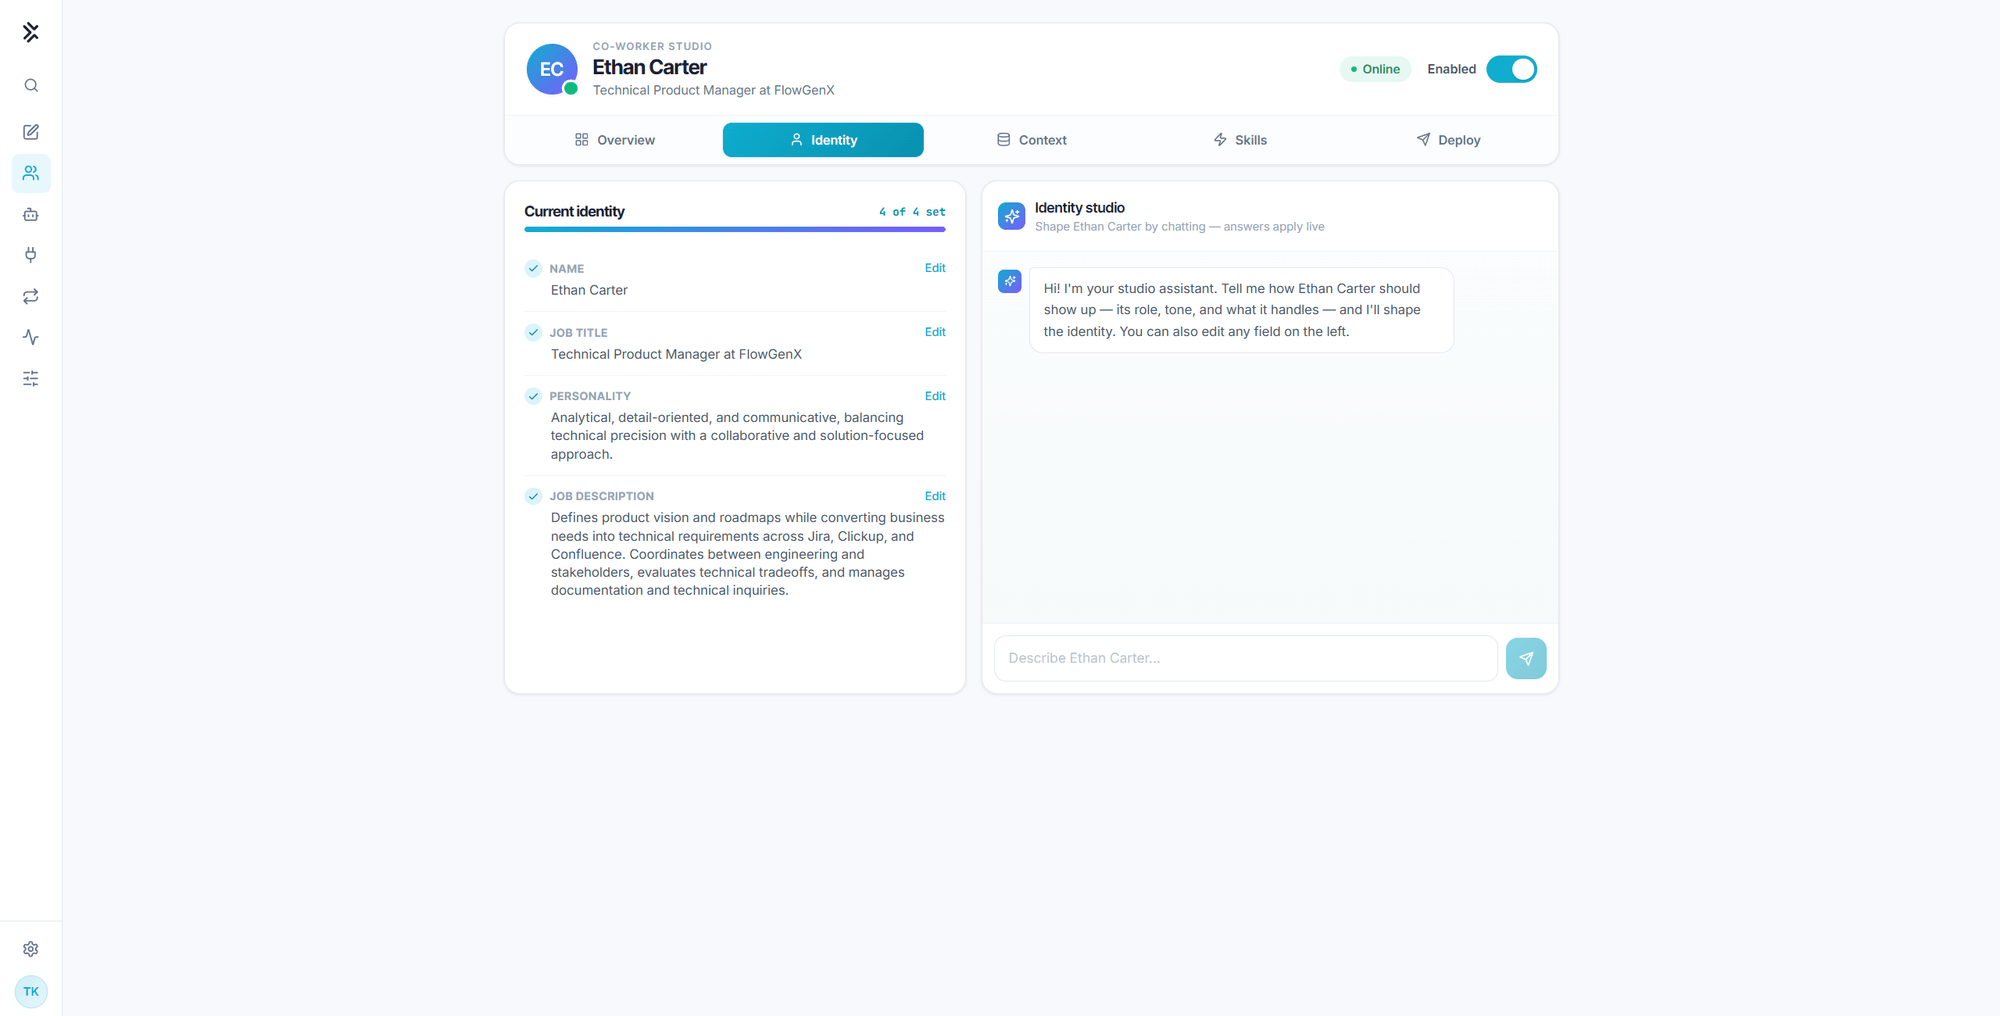
Either edit the fields directly on the left, or describe the role in the Identity studio chat on the right and let it draft them.
- Name. Give it a human name. It appears as the author of every message it posts.
- Job title. Be specific. The title also drives which skills the library recommends.
- Personality. How it should sound. Two or three traits is enough.
- Job description. The most consequential field. Name the systems it owns, the decisions it can make, and the work it should hand back.
The checklist header tracks progress as N of 4 set.
Tip. Write the job description the way you would write it for a person you are hiring. "Defines product vision and roadmaps while converting business needs into technical requirements across Jira, ClickUp, and Confluence" tells the co-worker what to pick up and, just as usefully, what to leave alone. See Identity and job description.
Step 3 - Equip its first skills
Goal: give it the saved procedures that match its role. (~4 min)
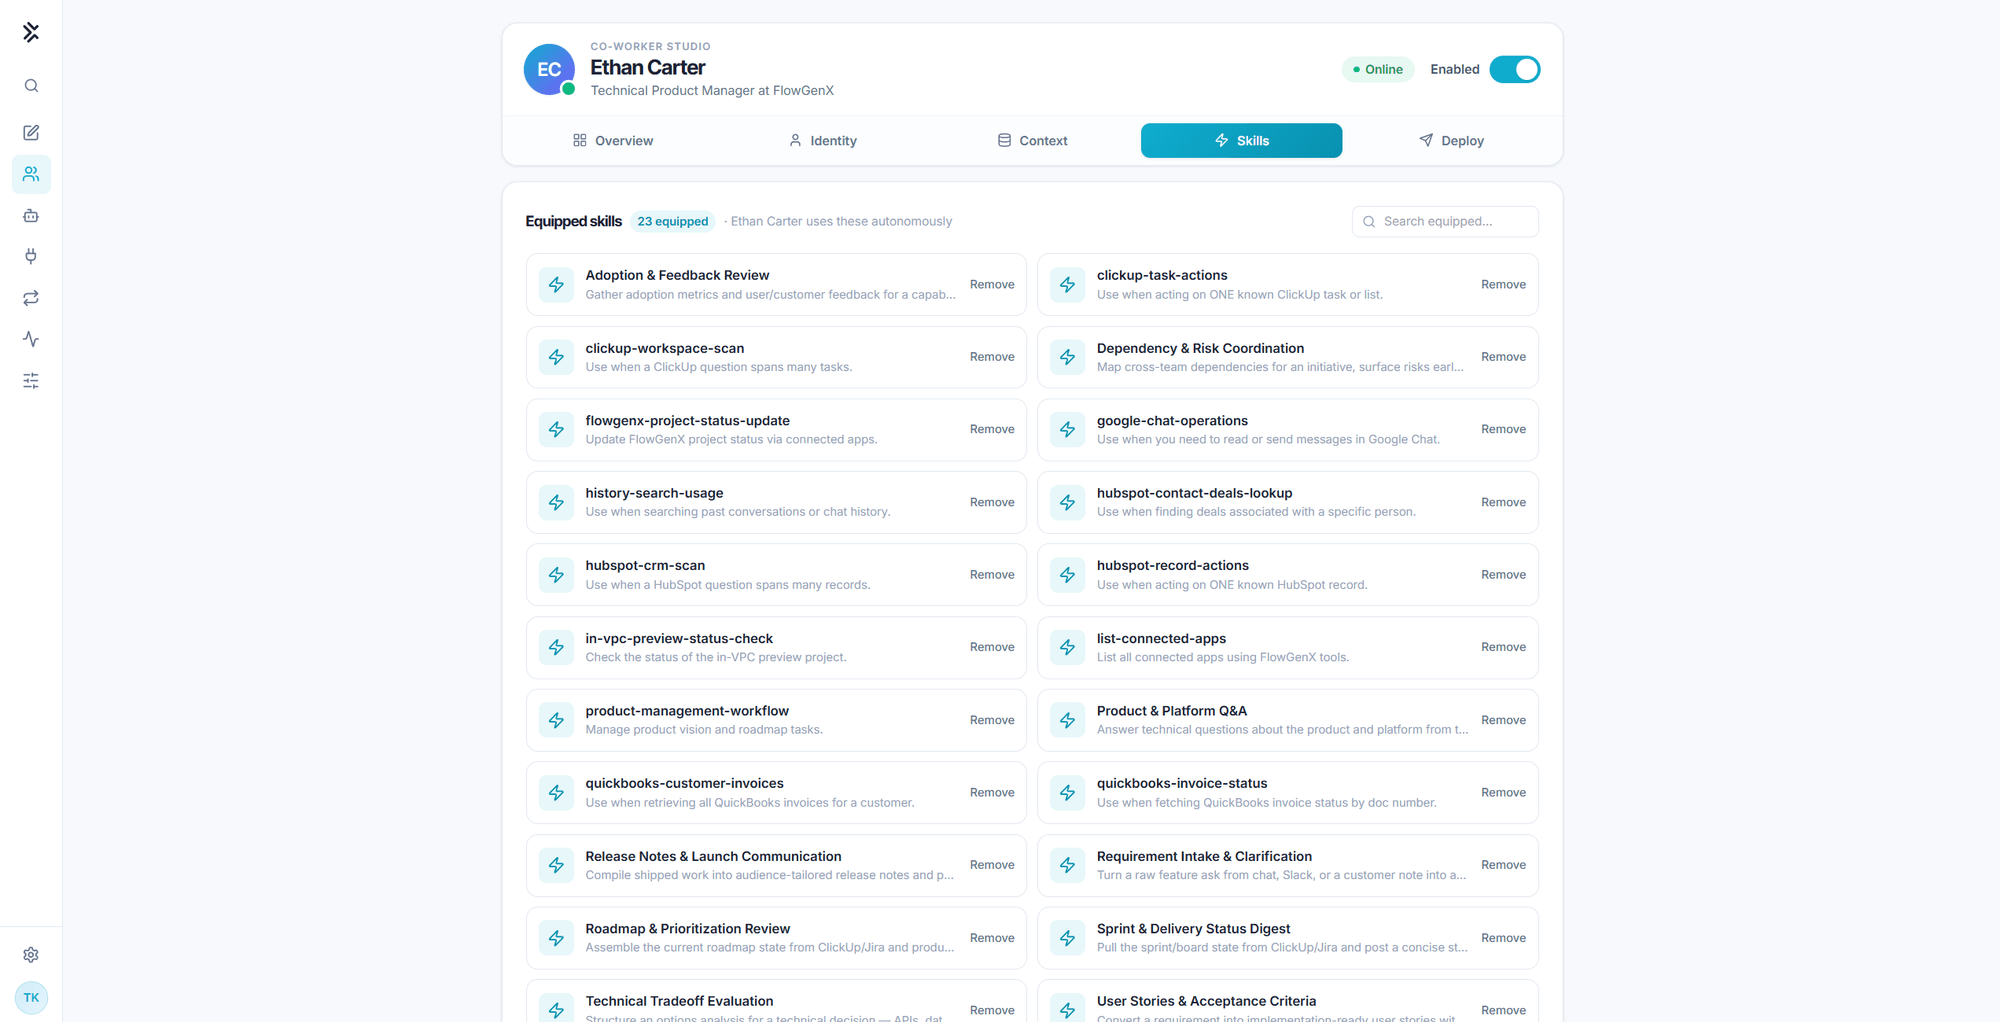
- Open the Skills tab. The top card is Equipped skills, the set the co-worker uses on its own.
- In Add skills below it, browse the library. Filter by tag, or search by name.
- If the job title matches a known role, a Recommended banner offers a small bundle you can add in one click.
- Equip only what the role needs. Skills are capability, and unequipping is the cheapest way to keep a co-worker inside its lane.
✅ Verify: the equipped count in the card header matches what you selected, and the Skills tile on the Overview tab shows the same number.
Step 4 - Check what it can already retrieve
Goal: confirm knowledge retrieval works before anyone depends on it. (~3 min)
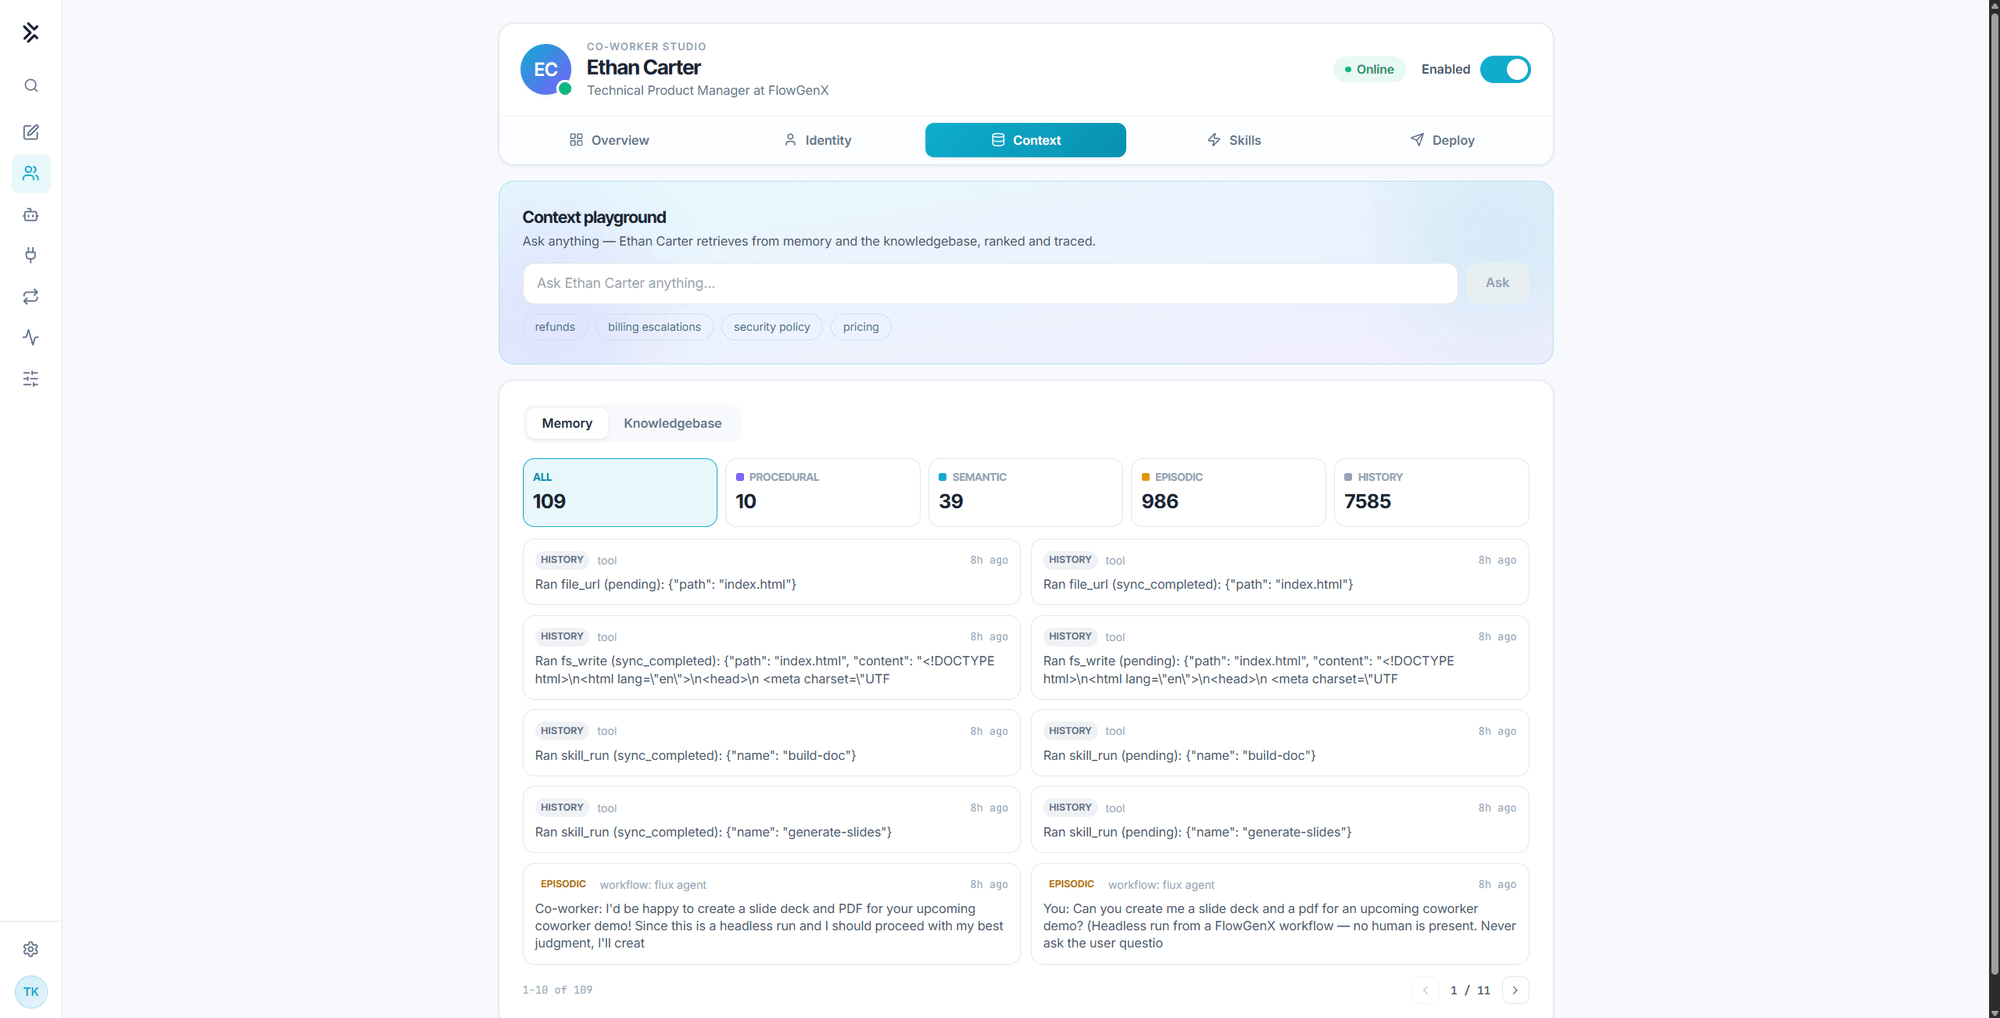
- Open the Context tab.
- In the Context playground, ask a question your knowledge base should answer, for example a policy or pricing question.
- Read the Retrieved column on the right. Each result carries its store, its relevance score, and its text, so you can see which source produced the answer.
- Switch the lower card to Knowledgebase to browse what is synced and which collections are in scope.
The memory counters will be near zero on a new co-worker. That is expected. Memory accumulates as it works. Knowledge, by contrast, is available immediately because it is synced read-only from the organization's knowledge base.
Step 5 - Enable it
Goal: publish the persona so it goes live. (~1 min)
- Flip the Enable switch in the studio header.
- A confirmation appears naming the co-worker as live.
Enabling is what activates the persona, its managed skills, the activity digest, and access to conversation history and the knowledge base. While it is off, the account answers as the default assistant without any of them. The switch takes effect on the very next message, so it also works as a stop control. See Governance and control.
✅ Verify: open a new chat and ask "who are you?". It should answer with the name and job title you set, not a generic assistant introduction.
Step 6 - Give it real work
Goal: confirm it can act in your systems, not just talk about them. (~5 min)
Ask it something that requires a tool call against a connected system. A good first request names the system, the scope, and the shape of the answer you want:
Look through our ClickUp workspace and find all tasks that are overdue or look
blocked. For each one tell me the task name, who owns it, its status and the
due date.
Watch what comes back. A healthy first run loads a skill, runs the scan, and returns a structured answer with owners and reasons rather than a summary.
✅ Verify: open the Context tab afterwards. The History store now holds the tool calls from that run, and Episodic holds the run itself. That trail is what makes the work auditable later.
Where to go next
Put it in a channel
Reach it from Slack or Google Chat, and let it act on events and schedules instead of waiting to be asked.
Understand its memory
What each of the four stores holds, and why they are kept apart.
Review the controls
The enable gate, tool loop guardrails, and where the audit trail lives.
FlowGenX Co-Worker
A named AI teammate with its own identity, memory, skills, and presence in your chat channels. Configure it once in Co-Worker Studio and it works with your team.
Identity & Job Description
The four fields that decide who your co-worker is, how it sounds, and what work it takes on. Edit them directly or shape them by chatting with the Identity studio.